How to acclimatize new shrimp correctly
When new shrimp come home, it's easy to want to drop them straight into the aquarium.
Don't do it.
Acclimatization is one of the most important aspects of the whole shrimp hobby. Many shrimp do not die because they are weak or because the transport was bad. They die because the difference between the transport water and the aquarium water becomes too great and the change happens too quickly.
Shrimp are sensitive to rapid changes in water values. This particularly applies to temperature, pH, GH, KH and TDS.
Therefore, new shrimp should always be allowed to slowly get used to their new water.
Why is acclimatization so important?
When shrimp are transported, they lie in a limited volume of water for several hours or sometimes longer.
During transport, several things can change:
• The temperature drops or rises
• The oxygen level changes
• pH can be changed
• Waste collects in the water
• The shrimp get stressed
When the bag is then opened and the shrimp are quickly moved to a completely different water, the body can get a shock.
It is often called osmotic stress.
It simply means that the shrimp's body does not have time to adapt to the difference in mineral content and water chemistry.
The most common mistake
The most common mistake is to just let the bag float in the aquarium for 20-30 minutes and then release the shrimp.
It just evens out the temperature.
It does not adapt the shrimp to differences in pH, GH, KH and TDS.
For fish, temperature equalization can sometimes be better, but for shrimp it is often not enough.
Shrimp need slow water adaptation.
Best method: the drip method
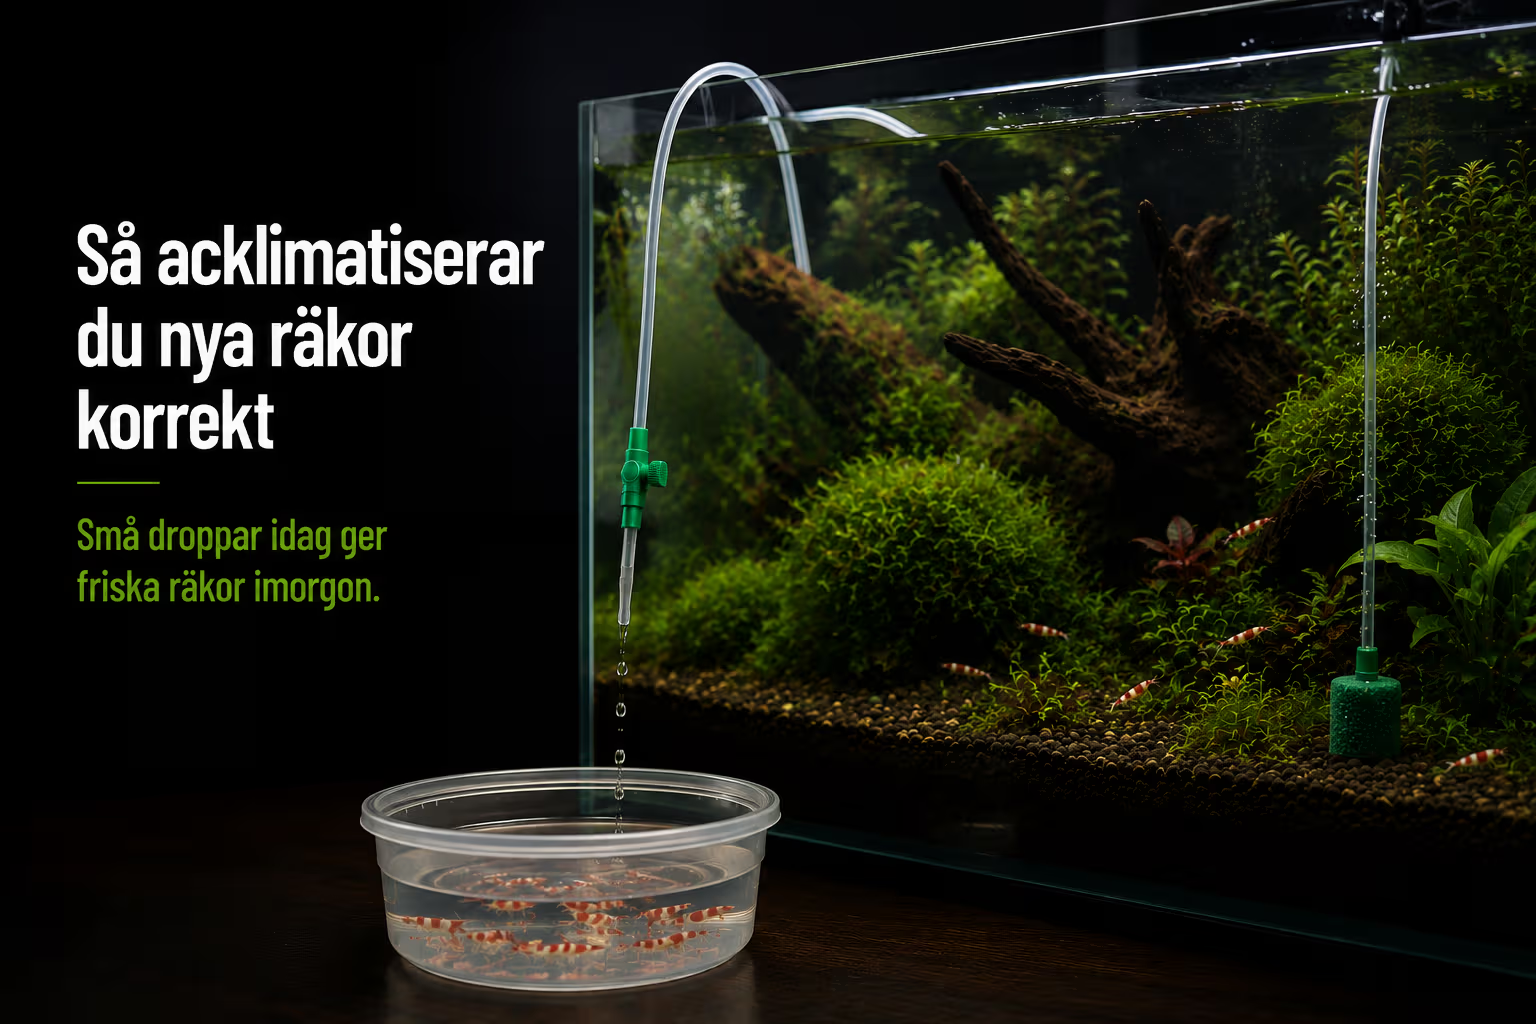
The drip method is the safest method for most shrimp.
It involves slowly dripping aquarium water into the transport water where the shrimp are.
In this way, the water values change gradually instead of quickly.
It is especially important for:
• Caridina
• Crystal Red
• Crystal Black
• Blue Bolt
• Pinto
• Taiwan Bee
• Shrimp sent by mail
• Shrimp that come from a lot of water other than your own
The drip method also works great for Neocaridina such as Bloody Mary, Red Sakura, Blue Dream, Blue Velvet, Yellow and Orange Sakura.
Equipment for the drip method
You need:
• A clean bowl or bowl
• A thin hose
• A valve or clamp to regulate the flow
• A rake
• Preferably an acclimatization kit
An acclimatization kit makes the method much easier as you can better control the drip rate.
Such a kit normally consists of a hose and a valve that allows you to let aquarium water drip slowly down to the shrimp.
This is how an acclimatization kit works
An acclimatization kit is used to create a slow and controlled flow from the aquarium to the shrimp tank.
The principle is simple:
The shrimp are placed in a clean bowl together with the transport water.
One part of the hose is placed in the aquarium.
The other end goes down into the bowl.
The flow is started gently.
The valve is adjusted so that the water drips slowly.
The shrimps are allowed to get used to it gradually for about 1.5–2 hours.
On the AquaShrimp acclimation kit, about one drop per second and about two hours of acclimatization are recommended before moving the shrimp over with a net.
Step by step: the drip method
Step 1 – Turn off or dim the lights
When the shrimps come home, they are often stressed.
Subdued lighting makes the transition calmer.
Feel free to turn off the aquarium light during the first part of the acclimatization.
Step 2 – Carefully open the bag
Open the transport bag and carefully pour over the prawns and the transport water in a clean bowl.
Never use a bowl that has had detergent, soap or chemicals in it.
Step 3 – Check the shrimp
Take a quick look at the shrimp.
They may be pale after transport, but they should preferably be moving.
Stressed shrimp may sit still for a while. It does not necessarily mean that something is wrong.
Step 4 – Start the droplet
Place the hose from the aquarium to the bowl.
Start the flow and adjust the valve so that it drips slowly.
A good start is roughly:
1 drop per second
If the difference between the waters is large, you can drive even slower.
Step 5 – Let it take time
For most shrimp we recommend:
1.5–2 hours
For sensitive Caridina or large differences in water values, it is better to let it take longer.
Don't stress.
It is better to acclimatize slowly than quickly.
Step 6 – Gradually increase the amount of water
When the amount of water in the bowl has doubled, you can carefully pour some water away and continue dripping.
The goal is that the largest part of the water in the bowl should eventually consist of your aquarium water.
Step 7 – Move the shrimp with net
When the acclimatization is complete, the shrimps must be moved with a net.
Do not pour the transport water into the aquarium.
Transport water can contain waste, stress substances and imbalances from the transport.
Step 8 – Leave them alone
Once the shrimp are in the aquarium, leave them alone.
Do not feed directly.
Please keep the lighting dimmed for the rest of the day.
Give the shrimp time to find shelter, moss and quiet places.
Alternative method: the cup method
The cup method works when you don't have a tube or acclimatization kit.
It is simpler but less accurate.
Here's how to do it:
Place the prawns and the transport water in a bowl.
Take a small amount of aquarium water.
Carefully pour some water into the bowl.
Wait 5-10 minutes.
Repeat for 1-2 hours.
Move the shrimp with a net.
This method works best for hardier Neocaridina and when the difference in water values is not that great.
For more sensitive shrimp, the drip method is better.
Alternative method: liquid bag
Allowing the bag to float in the aquarium will help even out the temperature.
But it is not enough as full acclimatization.
This method can be a first step, but should not be the only method for shrimp.
If you use it:
Let the bag float for 15-20 minutes.
Then open the bag.
Continue with the drip method or the cup method.
Temperature is only part of the problem.
The water values are at least as important.
How long should acclimatization take?
As a simple guideline:
Neocaridina
Example:
• Bloody Mary
• Ride Sakura
• Blue Diamond
• Blue Navy
• Yellow
• Orange Sakura
Recommended time:
1–2 hours
Caridina
Example:
• Crystal Red
• Crystal Black
• Blue Bolt
• Black Panda
• Pinto
Recommended time:
2 hours or longer
Caridina is often more sensitive to differences in water values and should be treated extra carefully.
When should you be extra careful?
Be extra careful about:
• The prawns have been sent by post
• It is cold or hot outside
• The shrimp are Caridina
• Your aquarium has a very different TDS
• Your aquarium has a different pH than the seller's water
• The shrimp look stressed
• You move shrimp between active soil and ordinary tap water
The greater the difference between the waters, the slower the acclimatization should be.
Should the water be measured?
That is a very good idea.
Especially if you often buy or sell shrimp.
The most important values to understand are:
• Temperature
• pH
• GH
• KH
• TDS
TDS is particularly useful because it gives a quick picture of how much difference there can be between the transport water and the aquarium water.
For example, if the transport water is at 120 ppm and your aquarium is at 320 ppm, you should acclimatize slowly.
Should you feed after deposit?
No, please wait.
The shrimp first need to recover.
It is better to let them graze naturally on biofilm, mosses and plants for the first day.
After 24 hours you can start feeding very carefully.
Common mistakes
For quick deposit
This is the most common and dangerous mistake.
Just temperature equalization
The bag floats in the aquarium, but the water values are not adjusted.
Transport water is poured into the aquarium
Avoid this.
Move the shrimp with a net instead.
Too strong direct lighting
Stressed shrimp want peace.
Feeding immediately after arrival
It increases the load on the aquarium unnecessarily.
Too big differences in TDS
This is a common cause of problems after moving.
Signs that the acclimatization went well
After a few hours or the next day, the shrimp should:
• Move normally
• Graze on mosses and plants
• Explore the aquarium
• Show better color again
• Don't swim around panicking
A little pale color the first day is normal.
The important thing is that they gradually become calmer and more active.
Our recommendation
For the safest result:
✓ Use the drip method
✓ Acclimatize for at least 1.5–2 hours
✓ Feel free to use the acclimatization kit
✓ Turn off or dim the lighting
✓ Move the shrimp with a net
✓ Do not pour the transport water into the aquarium
✓ Do not feed directly for the first few hours
This reduces the risk of stress and increases the chance that the shrimp will handle the move well.
Conclusion
Acclimatization is not an extra step.
It is a crucial part of being successful with shrimp.
Shrimp often cope well with transport if they are then given a calm and controlled transition to their new water.
The best method is the drip method, especially when using an acclimatization kit that makes the flow easy to control.
Take your time.
Allow the shrimp to adjust slowly.
It can be the difference between a stressed start and a strong, healthy colony that starts to thrive from day one.